> ## Documentation Index
> Fetch the complete documentation index at: https://docs.pawapay.io/llms.txt
> Use this file to discover all available pages before exploring further.
# Payment Page
The payment page allows you to request a payment from a customer together with the customer experience for the payment.
Funds will be moved from the customer's mobile money wallet to your account in PawaPay.
In this guide, we will go through some different use cases and make sure the payment statuses are in sync between you and PawaPay.
If you haven't already, check out the following information to set you up for success with this guide.
Understand some considerations to take into account when working with mobile money.
Sort out API tokens and callbacks.
## What does it look like
The PawaPay Payment Page allows you to quickly integrate mobile money into your website or mobile app providing:
* A user experience for your customers that is optimised for mobile money.
* Responsive design that works on desktop and mobile.
* Low code integration supporting all countries and providers.
* Support for both e-commerce and e-wallet use cases.
With just a single API call and a redirect, the customers can pay you.
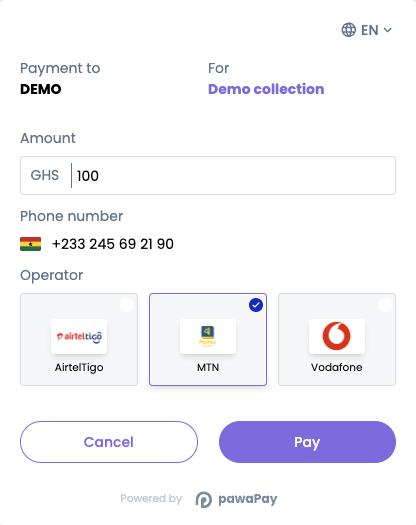
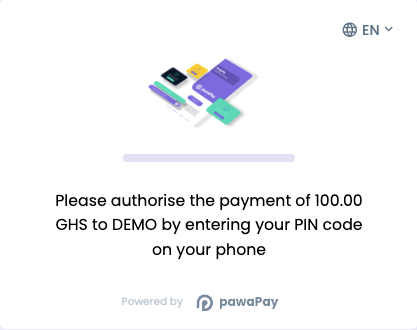
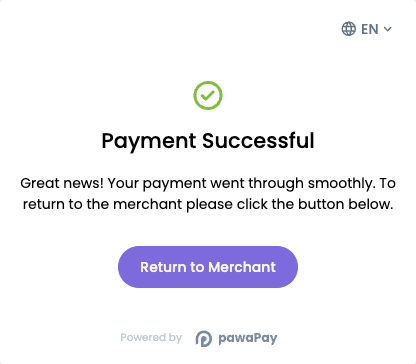 It is also integrated with the rest of the PawaPay Merchant API, providing benefits such as:
* Phone numbers are validated to be in the correct format.
* The provider to use for the payment is predicted based on the entered phone number.
* Minimum and maximum transaction limits are always up to date and validated.
* When new countries or providers are enabled, they are available for your customers immediately.
* Information about provider downtime is integrated into the user experience.
* And many more improvements to come...
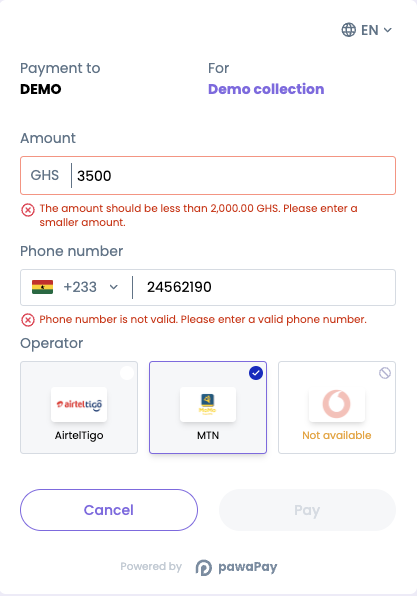
It is also integrated with the rest of the PawaPay Merchant API, providing benefits such as:
* Phone numbers are validated to be in the correct format.
* The provider to use for the payment is predicted based on the entered phone number.
* Minimum and maximum transaction limits are always up to date and validated.
* When new countries or providers are enabled, they are available for your customers immediately.
* Information about provider downtime is integrated into the user experience.
* And many more improvements to come...
 ## How to use it
Let's take a look at a couple of different use cases for the Payment page.
Then we will also see how to handle payment results.
The payment page can support accepting a payment from any country in any amount below the transaction limits for the provider.
We do that using the [Deposit via payment page](/v2/api-reference/payment-page/deposit-via-payment-page) endpoint.
```json {} theme={null}
POST https://api.sandbox.pawapay.io/v2/paymentpage
{
"depositId": "695776cf-73ba-42ff-b9cb-2b9acc008e22",
"returnUrl": "https://merchant.com/returnUrl",
"reason": "Demo payment"
}
```
We ask you to generate a UUIDv4 `depositId` to uniquely identify the deposit that will be processed using the payment page.
This is so that you always have a reference to the deposit you are expecting, even if you do not receive a response from us due to network errors.
This allows you to always **reconcile all payments** between your system and PawaPay.
You should store this depositId in your system **before** initiating the deposit with PawaPay.
The `returnUrl` specifies where the customer should be redirected to after they have gone through the payment process.
The `reason` field is optional. It will be shown on the payment page to the customer to indicate what they are paying for.
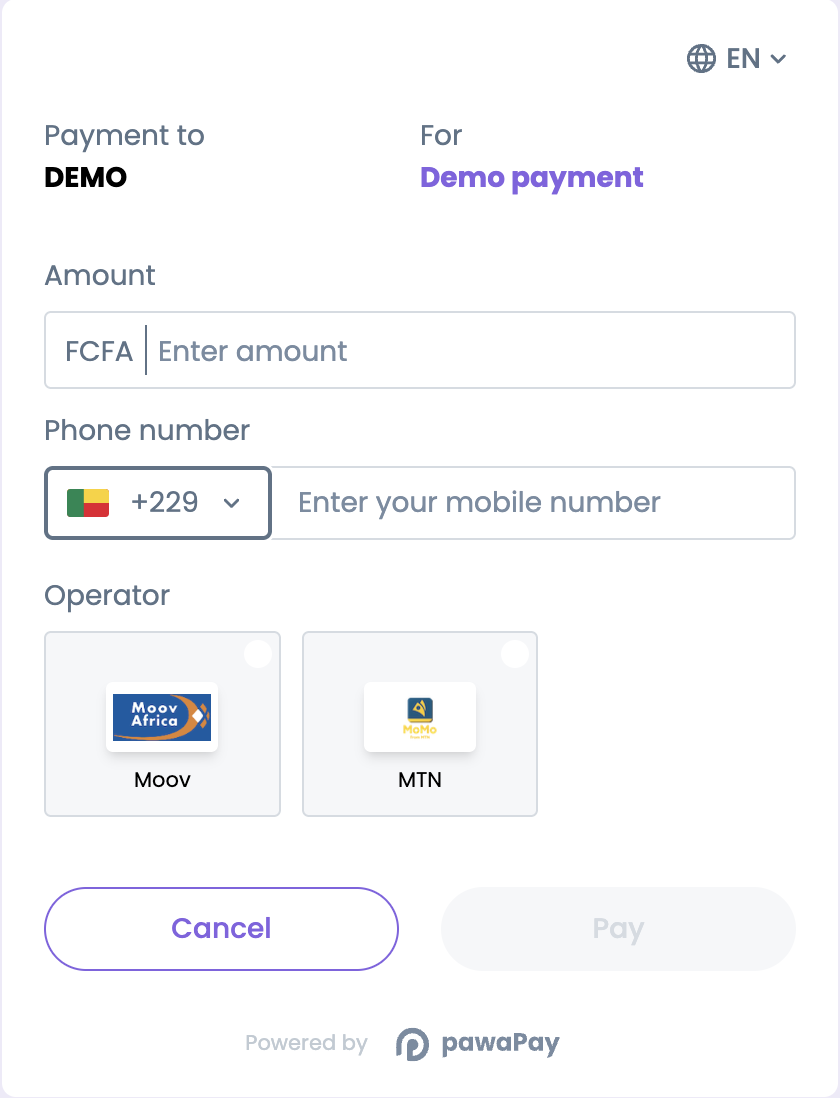
The payment page allows them to choose the country from the dropdown.
## How to use it
Let's take a look at a couple of different use cases for the Payment page.
Then we will also see how to handle payment results.
The payment page can support accepting a payment from any country in any amount below the transaction limits for the provider.
We do that using the [Deposit via payment page](/v2/api-reference/payment-page/deposit-via-payment-page) endpoint.
```json {} theme={null}
POST https://api.sandbox.pawapay.io/v2/paymentpage
{
"depositId": "695776cf-73ba-42ff-b9cb-2b9acc008e22",
"returnUrl": "https://merchant.com/returnUrl",
"reason": "Demo payment"
}
```
We ask you to generate a UUIDv4 `depositId` to uniquely identify the deposit that will be processed using the payment page.
This is so that you always have a reference to the deposit you are expecting, even if you do not receive a response from us due to network errors.
This allows you to always **reconcile all payments** between your system and PawaPay.
You should store this depositId in your system **before** initiating the deposit with PawaPay.
The `returnUrl` specifies where the customer should be redirected to after they have gone through the payment process.
The `reason` field is optional. It will be shown on the payment page to the customer to indicate what they are paying for.
The payment page allows them to choose the country from the dropdown.
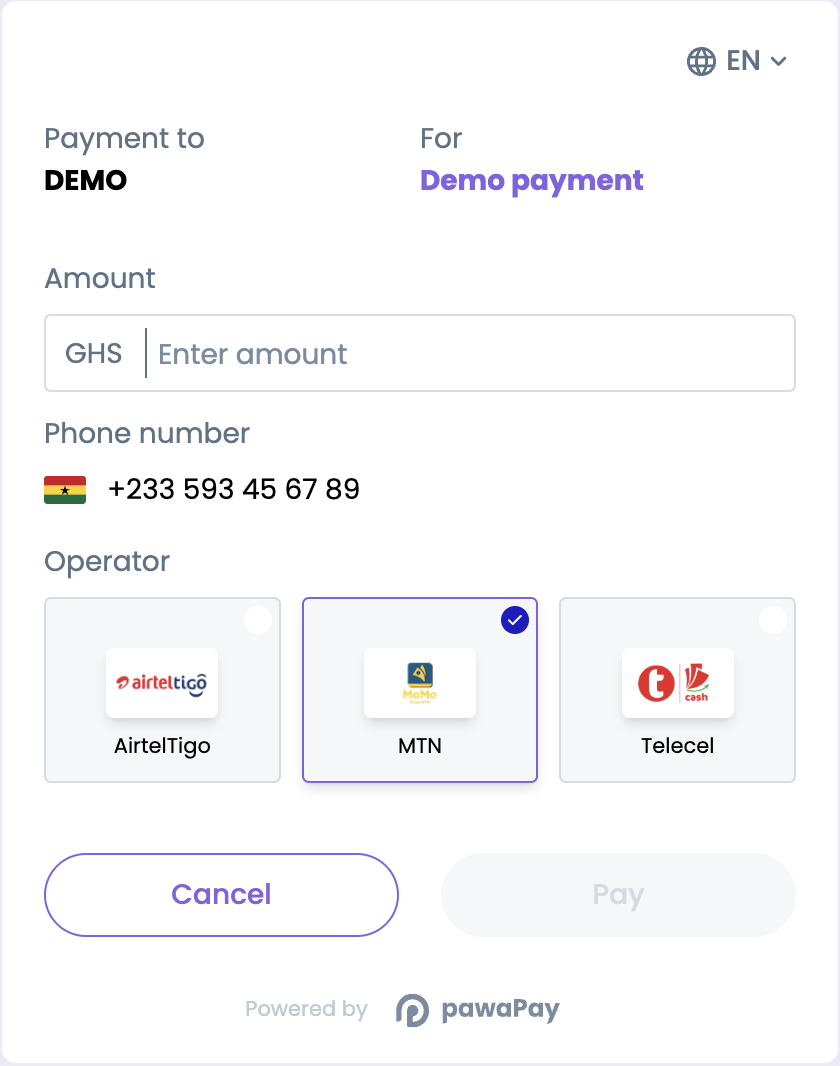
 If you have registered users who should only use the number that they signed up with for payments, you can fix the phone number on the payment page.
```json {6} theme={null}
POST https://api.sandbox.pawapay.io/v2/paymentpage
{
"depositId": "375fb9c9-fe34-48fd-95b2-b0aff9928673",
"returnUrl": "https://merchant.com/returnUrl",
"msisdn": "233593456789",
"reason": "Demo payment"
}
```
The `msisdn` fixes the mobile money wallet that can be used for this payment.
When collecting the phone number, we strongly recommend using our [predict provider](/v2/api-reference/toolkit/predict-provider) endpoint.
It validates the phone number and returns it in a format that works for use with the payment page.
The payment page only allows them to choose the amount to pay.
If you have registered users who should only use the number that they signed up with for payments, you can fix the phone number on the payment page.
```json {6} theme={null}
POST https://api.sandbox.pawapay.io/v2/paymentpage
{
"depositId": "375fb9c9-fe34-48fd-95b2-b0aff9928673",
"returnUrl": "https://merchant.com/returnUrl",
"msisdn": "233593456789",
"reason": "Demo payment"
}
```
The `msisdn` fixes the mobile money wallet that can be used for this payment.
When collecting the phone number, we strongly recommend using our [predict provider](/v2/api-reference/toolkit/predict-provider) endpoint.
It validates the phone number and returns it in a format that works for use with the payment page.
The payment page only allows them to choose the amount to pay.
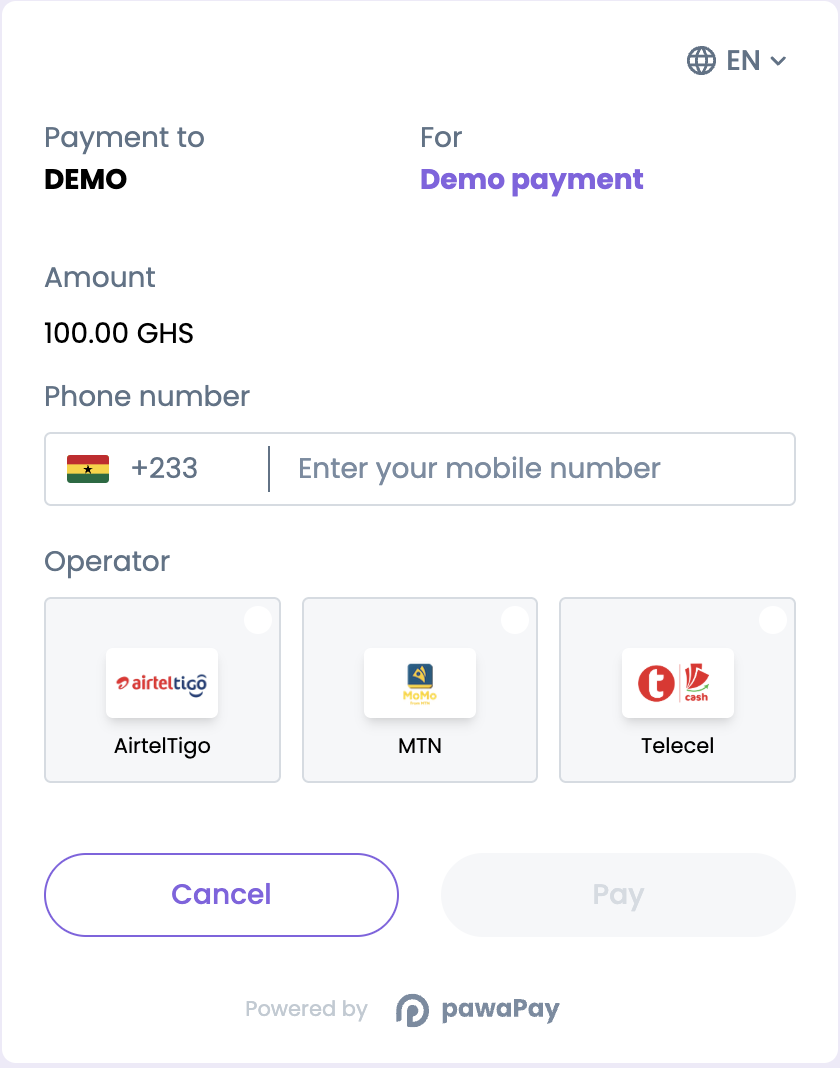
 In case you know how much the customer should be paying, but they can choose the mobile money wallet they want to pay from, you can fix the amount as well.
```json {6-7} theme={null}
POST https://api.sandbox.pawapay.io/v2/paymentpage
{
"depositId": "375fb9c9-fe34-48fd-95b2-b0aff9928673",
"returnUrl": "https://merchant.com/returnUrl",
"amount": "100",
"country": "GHA",
"reason": "Demo payment"
}
```
The `amount` specifies the amount that can be used for this payment.
[Providers](/v2/docs/providers) have transaction limits.
You can use the [active configuration](/v2/api-reference/toolkit/active-configuration) endpoint to validate the amount is within the transaction limits.
The payment page will fail to initiate if the amount is out of bounds.
It is not possible to fix the `amount` without specifying the `country`.
The payment page will allow the customer to specify the phone number of the mobile money wallet they are paying from.
In case you know how much the customer should be paying, but they can choose the mobile money wallet they want to pay from, you can fix the amount as well.
```json {6-7} theme={null}
POST https://api.sandbox.pawapay.io/v2/paymentpage
{
"depositId": "375fb9c9-fe34-48fd-95b2-b0aff9928673",
"returnUrl": "https://merchant.com/returnUrl",
"amount": "100",
"country": "GHA",
"reason": "Demo payment"
}
```
The `amount` specifies the amount that can be used for this payment.
[Providers](/v2/docs/providers) have transaction limits.
You can use the [active configuration](/v2/api-reference/toolkit/active-configuration) endpoint to validate the amount is within the transaction limits.
The payment page will fail to initiate if the amount is out of bounds.
It is not possible to fix the `amount` without specifying the `country`.
The payment page will allow the customer to specify the phone number of the mobile money wallet they are paying from.
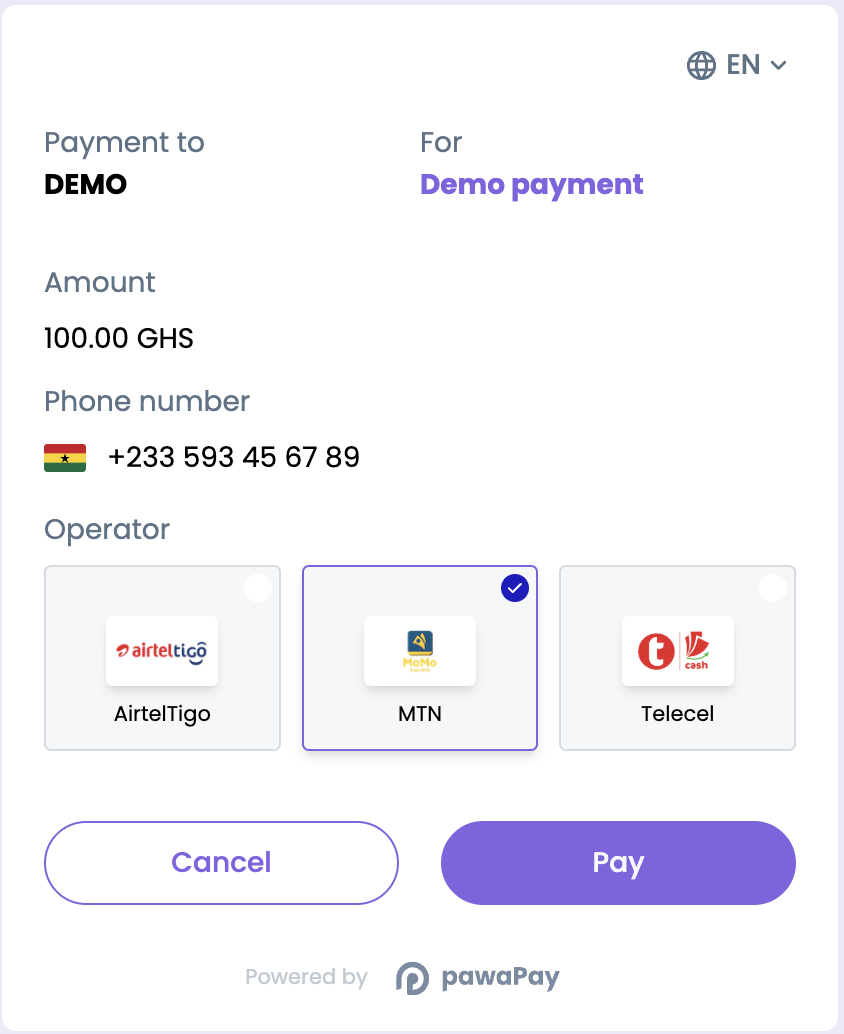
 When you have only registered users and the amount is predetermined, you can initiate the payment page to fix those parameters so the customers cannot change them.
We do that using the [Deposit via payment page](/v2/api-reference/payment-page/deposit-via-payment-page) endpoint.
```json {} theme={null}
POST https://api.sandbox.pawapay.io/v2/paymentpage
{
"depositId": "695776cf-73ba-42ff-b9cb-2b9acc008e22",
"returnUrl": "https://merchant.com/returnUrl",
"msisdn": "233593456789",
"amount": "100",
"reason": "Demo payment"
}
```
In the request we have specified the `msisdn` (phone number) that **must** be used for the payment.
We have also fixed the `amount` to 100 so it cannot be changed by the customer.
When you have only registered users and the amount is predetermined, you can initiate the payment page to fix those parameters so the customers cannot change them.
We do that using the [Deposit via payment page](/v2/api-reference/payment-page/deposit-via-payment-page) endpoint.
```json {} theme={null}
POST https://api.sandbox.pawapay.io/v2/paymentpage
{
"depositId": "695776cf-73ba-42ff-b9cb-2b9acc008e22",
"returnUrl": "https://merchant.com/returnUrl",
"msisdn": "233593456789",
"amount": "100",
"reason": "Demo payment"
}
```
In the request we have specified the `msisdn` (phone number) that **must** be used for the payment.
We have also fixed the `amount` to 100 so it cannot be changed by the customer.
 In the response you will receive the `redirectUrl`.
```json theme={null}
{
"redirectUrl": "https://sandbox.paywith.pawapay.io/?token=AgV4iTX%2FzQ2Jryg0teMwiVww5uf2OJYyCVbsZO3ERr8vW80AkAADABVhd3MtY3J5cHRvLXB1YmxpYy1rZXkAREFnWjh5OWZ2enVLNXVlZmRhQ3lwaUs4UCsxU3kyZllSanJtdk81Sis1eWxFYmwxR2VubmgwNkJhSmpMa2t2Y1M1QT09AAdwdXJwb3NlAA5jcmVhdGUtc2Vzc2lvbgAFc3RhZ2UAD3NpZ24tY2xvdWRmcm9udAACAAdhd3Mta21zAE5hcm46YXdzOmttczpldS1jZW50cmFsLTE6NDgwMTk5MzI1NDYzOmtleS9hOWRkZTRkMC1iOTAyLTQ5NzgtYjA5NS1hN2M2N2JiM2Y2YWQAuAECAQB4S2upLB%2B%2FYU%2FEVudxFv5jvmTrgfd74VlX4aL%2Bnszo7yIBKG0J%2Fs4QSpOHpiKVsGFhZAAAAH4wfAYJKoZIhvcNAQcGoG8wbQIBADBoBgkqhkiG9w0BBwEwHgYJYIZIAWUDBAEuMBEEDCDncSOhrmk9d5l6NwIBEIA7vkZSLecrmFtub%2FRif%2F6hHTXTiC9%2Bv98fV%2F4VLtkqKFd0vuZgZaWdQBKsHFyTZarMA4fRKtTffzqHNfcAB2F3cy1rbXMATmFybjphd3M6a21zOmV1LWNlbnRyYWwtMTo0ODAxOTkzMjU0NjM6a2V5L2E5ZGRlNGQwLWI5MDItNDk3OC1iMDk1LWE3YzY3YmIzZjZhZAC4AQICAHhLa6ksH79hT8RW53EW%2FmO%2BZOuB93vhWVfhov6ezOjvIgFj2PbqXlPVVqGVyUyAparTAAAAfjB8BgkqhkiG9w0BBwagbzBtAgEAMGgGCSqGSIb3DQEHATAeBglghkgBZQMEAS4wEQQMq7enbFjL5gp6GpBDAgEQgDviHiuhaSeHyBkKFWzxjPba%2BTawnP2%2Fa0nVA2fkzrkQS9DULIoLgktu8MRodlDwj38nqiR84qCLy3bUNQIAABAAw6RHjDCLE0oV4Sb5i39layxoxK4W%2FYDFy8Ctn5EnHah%2FewL78joydsqjjsR2duOf%2F%2F%2F%2F%2FwAAAAEAAAAAAAAAAAAAAAEAAAEWF8lZFuQT%2FNGvGwYYILR4k9DRCeHxYgKI%2FiTLjdLdq6PcfxFjdr6dxqvsFr0ntNCXnlGawjbUcMQvwNqBFbM5YGlWQC5SNjblK305ycuH8NOTY4U5j%2BWOKwf%2BlKgrSzT1plmHLk6vDDLxxnE2Wbe1nhQMyyUxIHdKoODaAcQl%2BBsMkSLrkfVIFaTQXtGtWSK24ImD%2BOaTijY8OYg06bprnDe6SujDJx7ZbpBrFQZxtvM9MRfsypAFJe5zn5pn2Xwu4W2goyRlweHbqR%2BufqxijYYAOnCSXr6bxDu%2FQtT763HHAzaBiVCI%2FAXYoy62mp%2B1mdICERxeYSls4eteomyjA7vN8ktOCotSm0HBBmsxtsq6EhTKyFK0cWTJrW6992qJqSUv%2BK%2B7AGcwZQIwL%2BT%2BRduDkmGBMn45cRuvV0Hef4Odd9M5CknNBnz9UsXhqGDqeX55PRoFCfEr4gTvAjEA9xOpVLwF%2F1tmKa2CBSeGf0ckK%2BsMRkEnE8CRhRXPCxV0YsYI1mPAr40ZTlfIoM8U&depositId=6f3ae557-334e-48bb-bd73-ff04767b224f&returnUrl=https%3A%2F%2Fmerchant.com%2FreturnUrl&msisdn=233593456789&amount=100&country=GHA&reason=Demo%20payment&language=en&correspondent=MTN_MOMO_GHA&Expires=1748586499&Key-Pair-Id=K28YQ8X3BNV7W5&Signature=Jm6d1iEKKTO5TC1-t2J5-4d4I6AWtMEeyPiCHyytiDiruMZSMhkcPkMVpGI0CFfXxnQM9qGA9JmxcB4UcPkM3QTCTSPwmhyWp6FUAjhjR98sRfco2UfTtl1o9TjurcandF~Y5by5FqmWZlVF3QnkbXJjV5-tnPQitmQqyBL5vAhSw9JOUnUIn~dKZMO15V5s~-CL1FiqV1R~lXHrHtyiFBmNvukF1FDZaGAjvPhbcQKHOI5lK~6nzaQJDXP~SyXAGpSlOvoRWru0AuDDP9kdYIK8qT6UsCpNZiJrxx0ByR1Qq494d9ncn2viz0Tla8~6G1qTKgm3Z0lXTB-WgAmGEw__"
}
```
You should redirect the customer to the `redirectUrl`.
Once they have completed the payment process, they will be redirected to the `returnUrl` you provided in the request.
We've now created a payment page and redirected the customer to it.
Now let's take a look at how to find out whether the payment was completed successfully.
## How to find out the payment result
When the customer initiates the payment by pressing "Pay" on the payment page, the deposit will be registered in PawaPay with the `depositId` you specified.
When the payment completes you will receive a [deposit callback](/v2/api-reference/deposits/deposit-callback) with the final status of the payment.
If you have not configured callbacks, you can poll the [check deposit status](/v2/api-reference/deposits/check-deposit-status) endpoint.
Please note that the deposit will only be initiated when the customer presses the pay button.
If they abandon the payment page, the deposit will be `NOT_FOUND` and should be considered `FAILED` after 15 minutes.
On your `returnUrl` you should validate the final status of the payment by either confirming the callback has been received or using the [check deposit status](/v2/api-reference/deposits/check-deposit-status) endpoint.
The payment page session will be active for **15 minutes** after which it will expire.
No callback will be delivered on expiration.
Also, if the customer abandons the payment page, no callback will be delivered.
We now know what happened to the payment and can make sure it's reflected accurately.
Let's now take a look at how to handle failed payments.
## Handling processing failures
If the `status` of the deposit is `FAILED` you can find further information about the failure from `failureReason`.
It includes the `failureCode` and the `failureMessage` indicating what has gone wrong.
The `failureMessage` from PawaPay API is meant for you and your support and operations teams.
You are free to decide what message to show to the customer.
Find all the [failure codes](/v2/docs/failure_codes#transaction-failure-codes) and implement handling as you choose.
We recommend showing the customer the failure reason and an easy way to retry the payment in case of failure.
A new payment page needs to be created with a new `depositId` for the retry.
We have standardised the numerous different failure codes and scenarios with all the different providers.
The quality of the failure codes varies by provider.
The `UNSPECIFIED_FAILURE` code indicates that the provider indicated a failure with the payment, but did not provide any more specifics on the reason of the failure.
In case there is a general failure, the `UNKNOWN_ERROR` failureCode would be returned.
We have now also taken care of failures that can happen during payment processing.
This way the customer knows what has happened and can take appropriate action to try again.
Now let's see how to ensure that payment statuses between your system and PawaPay are in sync.
## Ensuring consistency
When working with financial APIs there are some considerations to take to ensure that you never think a payment is failed, when it is actually successful or vice versa.
It is essential to keep systems in sync on the statuses of payments.
Let's take a look at some considerations and pseudocode to ensure consistency.
All statuses should be checked defensively without assumptions.
```json theme={null}
if( status == "COMPLETED" ) {
myInvoice.setPaymentStatus(COMPLETED);
} else if ( status == "FAILED" ) {
myInvoice.setPaymentStatus(FAILED);
} else if ( status == "PROCESSING") {
handleRedirectionAuth();
} else {
//It is unclear what might have failed. Escalate for further investigation.
myInvoice.setPaymentStatus(NEEDS_ATTENTION);
}
```
The key reason we require you to provide a `depositId` for each payment is to ensure that you can always ask us what the status of a payment is, even if you never get a response from us.
You should always store this `depositId` in your system **before** [initiating a deposit](/v2/api-reference/deposits/initiate-deposit).
```json theme={null}
var depositId = new UUIDv4();
//Let's store the depositId we will use to ensure we always have it available even if something dramatic happens
myInvoice.setExternalPaymentId(depositId).save();
myInvoice.setPaymentStatus(PENDING);
try {
var initiationResponse = PawaPay.initiateDeposit(depositId, ...)
} catch (InterruptedException e) {
var checkResult = PawaPay.checkDepositStatus(depositId);
if ( result.status == "FOUND" ) {
//The payment reached PawaPay. Check the status of it from the response.
} else if ( result.status == "NOT_FOUND" ) {
//The payment did not reach PawaPay. Safe to mark it as failed.
myInvoice.setPaymentStatus(FAILED);
} else {
//Unable to determine the status. Leave the payment as pending.
//We will create a status recheck cycle later for such cases.
//In case of a system crash, we should also leave the payment in pending status to be handled in the status recheck cycle.
}
}
```
The important thing to notice here is that we only mark a payment as FAILED when there is a clear indication of its failure.
We use the [check deposit status](/v2/api-reference/deposits/check-deposit-status) endpoint when in doubt whether the payment was `ACCEPTED` by PawaPay.
Implementing the considerations listed above avoids almost all discrepancies of payment statuses between your system and PawaPay.
When using callbacks to receive the final statuses of payments, issues like network connectivity, system downtime, and configuration errors might cause the callback not to be received by your system.
To avoid keeping your customers waiting, we strongly recommend implementing a status recheck cycle.
This might look something like the following.
```json theme={null}
//Run the job every few minutes.
var pendingInvoices = invoices.getAllPendingForLongerThan15Minutes();
for ( invoice in pendingInvoices ) {
var checkResult = PawaPay.checkDepositStatus(invoice.getExternalPaymentId);
if ( checkResult.status == "FOUND" ) {
//Determine if the payment is in a final status and handle accordingly
handleInvoiceStatus(checkResult.data);
} else if (checkResult.status == "NOT_FOUND" ) {
//The payment has never reached PawaPay. Can be failed safely.
invoice.setPaymentStatus(FAILED);
} else {
//Something must have gone wrong. Leave for next cycle.
}
}
```
Having followed the rest of the guide, with this simple reconciliation cycle, you should not have any inconsistencies between your system and PawaPay.
Having these checks automated will take a load off your operations and support teams as well.
## Payments in reconciliation
When using PawaPay, you might find that a payment status is `IN_RECONCILIATION`.
This means that there was a problem determining the correct final status of a payment.
When using PawaPay **all payments are reconciled** by default and automatically - we validate all final statuses to ensure there are no discrepancies.
When encountering payments that are `IN_RECONCILIATION` you do not need to take any action.
The payment has already been sent to our automatic reconciliation engine and it's final status will be determined soon.
The reconciliation time varies by provider. Payments that turn out to be successful are reconciled faster.
## What to do next?
We've made everything easy to test in our sandbox environment before going live.
We have different phone numbers that you can use to test various failure scenarios on your sandbox account.
Make sure all the failure codes are handled.
To ensure your funds are safe even if your API token should leak, you can always implement signatures for financial calls to add another layer of security.
Have a look at what to consider to make sure everything goes well.
In the response you will receive the `redirectUrl`.
```json theme={null}
{
"redirectUrl": "https://sandbox.paywith.pawapay.io/?token=AgV4iTX%2FzQ2Jryg0teMwiVww5uf2OJYyCVbsZO3ERr8vW80AkAADABVhd3MtY3J5cHRvLXB1YmxpYy1rZXkAREFnWjh5OWZ2enVLNXVlZmRhQ3lwaUs4UCsxU3kyZllSanJtdk81Sis1eWxFYmwxR2VubmgwNkJhSmpMa2t2Y1M1QT09AAdwdXJwb3NlAA5jcmVhdGUtc2Vzc2lvbgAFc3RhZ2UAD3NpZ24tY2xvdWRmcm9udAACAAdhd3Mta21zAE5hcm46YXdzOmttczpldS1jZW50cmFsLTE6NDgwMTk5MzI1NDYzOmtleS9hOWRkZTRkMC1iOTAyLTQ5NzgtYjA5NS1hN2M2N2JiM2Y2YWQAuAECAQB4S2upLB%2B%2FYU%2FEVudxFv5jvmTrgfd74VlX4aL%2Bnszo7yIBKG0J%2Fs4QSpOHpiKVsGFhZAAAAH4wfAYJKoZIhvcNAQcGoG8wbQIBADBoBgkqhkiG9w0BBwEwHgYJYIZIAWUDBAEuMBEEDCDncSOhrmk9d5l6NwIBEIA7vkZSLecrmFtub%2FRif%2F6hHTXTiC9%2Bv98fV%2F4VLtkqKFd0vuZgZaWdQBKsHFyTZarMA4fRKtTffzqHNfcAB2F3cy1rbXMATmFybjphd3M6a21zOmV1LWNlbnRyYWwtMTo0ODAxOTkzMjU0NjM6a2V5L2E5ZGRlNGQwLWI5MDItNDk3OC1iMDk1LWE3YzY3YmIzZjZhZAC4AQICAHhLa6ksH79hT8RW53EW%2FmO%2BZOuB93vhWVfhov6ezOjvIgFj2PbqXlPVVqGVyUyAparTAAAAfjB8BgkqhkiG9w0BBwagbzBtAgEAMGgGCSqGSIb3DQEHATAeBglghkgBZQMEAS4wEQQMq7enbFjL5gp6GpBDAgEQgDviHiuhaSeHyBkKFWzxjPba%2BTawnP2%2Fa0nVA2fkzrkQS9DULIoLgktu8MRodlDwj38nqiR84qCLy3bUNQIAABAAw6RHjDCLE0oV4Sb5i39layxoxK4W%2FYDFy8Ctn5EnHah%2FewL78joydsqjjsR2duOf%2F%2F%2F%2F%2FwAAAAEAAAAAAAAAAAAAAAEAAAEWF8lZFuQT%2FNGvGwYYILR4k9DRCeHxYgKI%2FiTLjdLdq6PcfxFjdr6dxqvsFr0ntNCXnlGawjbUcMQvwNqBFbM5YGlWQC5SNjblK305ycuH8NOTY4U5j%2BWOKwf%2BlKgrSzT1plmHLk6vDDLxxnE2Wbe1nhQMyyUxIHdKoODaAcQl%2BBsMkSLrkfVIFaTQXtGtWSK24ImD%2BOaTijY8OYg06bprnDe6SujDJx7ZbpBrFQZxtvM9MRfsypAFJe5zn5pn2Xwu4W2goyRlweHbqR%2BufqxijYYAOnCSXr6bxDu%2FQtT763HHAzaBiVCI%2FAXYoy62mp%2B1mdICERxeYSls4eteomyjA7vN8ktOCotSm0HBBmsxtsq6EhTKyFK0cWTJrW6992qJqSUv%2BK%2B7AGcwZQIwL%2BT%2BRduDkmGBMn45cRuvV0Hef4Odd9M5CknNBnz9UsXhqGDqeX55PRoFCfEr4gTvAjEA9xOpVLwF%2F1tmKa2CBSeGf0ckK%2BsMRkEnE8CRhRXPCxV0YsYI1mPAr40ZTlfIoM8U&depositId=6f3ae557-334e-48bb-bd73-ff04767b224f&returnUrl=https%3A%2F%2Fmerchant.com%2FreturnUrl&msisdn=233593456789&amount=100&country=GHA&reason=Demo%20payment&language=en&correspondent=MTN_MOMO_GHA&Expires=1748586499&Key-Pair-Id=K28YQ8X3BNV7W5&Signature=Jm6d1iEKKTO5TC1-t2J5-4d4I6AWtMEeyPiCHyytiDiruMZSMhkcPkMVpGI0CFfXxnQM9qGA9JmxcB4UcPkM3QTCTSPwmhyWp6FUAjhjR98sRfco2UfTtl1o9TjurcandF~Y5by5FqmWZlVF3QnkbXJjV5-tnPQitmQqyBL5vAhSw9JOUnUIn~dKZMO15V5s~-CL1FiqV1R~lXHrHtyiFBmNvukF1FDZaGAjvPhbcQKHOI5lK~6nzaQJDXP~SyXAGpSlOvoRWru0AuDDP9kdYIK8qT6UsCpNZiJrxx0ByR1Qq494d9ncn2viz0Tla8~6G1qTKgm3Z0lXTB-WgAmGEw__"
}
```
You should redirect the customer to the `redirectUrl`.
Once they have completed the payment process, they will be redirected to the `returnUrl` you provided in the request.
We've now created a payment page and redirected the customer to it.
Now let's take a look at how to find out whether the payment was completed successfully.
## How to find out the payment result
When the customer initiates the payment by pressing "Pay" on the payment page, the deposit will be registered in PawaPay with the `depositId` you specified.
When the payment completes you will receive a [deposit callback](/v2/api-reference/deposits/deposit-callback) with the final status of the payment.
If you have not configured callbacks, you can poll the [check deposit status](/v2/api-reference/deposits/check-deposit-status) endpoint.
Please note that the deposit will only be initiated when the customer presses the pay button.
If they abandon the payment page, the deposit will be `NOT_FOUND` and should be considered `FAILED` after 15 minutes.
On your `returnUrl` you should validate the final status of the payment by either confirming the callback has been received or using the [check deposit status](/v2/api-reference/deposits/check-deposit-status) endpoint.
The payment page session will be active for **15 minutes** after which it will expire.
No callback will be delivered on expiration.
Also, if the customer abandons the payment page, no callback will be delivered.
We now know what happened to the payment and can make sure it's reflected accurately.
Let's now take a look at how to handle failed payments.
## Handling processing failures
If the `status` of the deposit is `FAILED` you can find further information about the failure from `failureReason`.
It includes the `failureCode` and the `failureMessage` indicating what has gone wrong.
The `failureMessage` from PawaPay API is meant for you and your support and operations teams.
You are free to decide what message to show to the customer.
Find all the [failure codes](/v2/docs/failure_codes#transaction-failure-codes) and implement handling as you choose.
We recommend showing the customer the failure reason and an easy way to retry the payment in case of failure.
A new payment page needs to be created with a new `depositId` for the retry.
We have standardised the numerous different failure codes and scenarios with all the different providers.
The quality of the failure codes varies by provider.
The `UNSPECIFIED_FAILURE` code indicates that the provider indicated a failure with the payment, but did not provide any more specifics on the reason of the failure.
In case there is a general failure, the `UNKNOWN_ERROR` failureCode would be returned.
We have now also taken care of failures that can happen during payment processing.
This way the customer knows what has happened and can take appropriate action to try again.
Now let's see how to ensure that payment statuses between your system and PawaPay are in sync.
## Ensuring consistency
When working with financial APIs there are some considerations to take to ensure that you never think a payment is failed, when it is actually successful or vice versa.
It is essential to keep systems in sync on the statuses of payments.
Let's take a look at some considerations and pseudocode to ensure consistency.
All statuses should be checked defensively without assumptions.
```json theme={null}
if( status == "COMPLETED" ) {
myInvoice.setPaymentStatus(COMPLETED);
} else if ( status == "FAILED" ) {
myInvoice.setPaymentStatus(FAILED);
} else if ( status == "PROCESSING") {
handleRedirectionAuth();
} else {
//It is unclear what might have failed. Escalate for further investigation.
myInvoice.setPaymentStatus(NEEDS_ATTENTION);
}
```
The key reason we require you to provide a `depositId` for each payment is to ensure that you can always ask us what the status of a payment is, even if you never get a response from us.
You should always store this `depositId` in your system **before** [initiating a deposit](/v2/api-reference/deposits/initiate-deposit).
```json theme={null}
var depositId = new UUIDv4();
//Let's store the depositId we will use to ensure we always have it available even if something dramatic happens
myInvoice.setExternalPaymentId(depositId).save();
myInvoice.setPaymentStatus(PENDING);
try {
var initiationResponse = PawaPay.initiateDeposit(depositId, ...)
} catch (InterruptedException e) {
var checkResult = PawaPay.checkDepositStatus(depositId);
if ( result.status == "FOUND" ) {
//The payment reached PawaPay. Check the status of it from the response.
} else if ( result.status == "NOT_FOUND" ) {
//The payment did not reach PawaPay. Safe to mark it as failed.
myInvoice.setPaymentStatus(FAILED);
} else {
//Unable to determine the status. Leave the payment as pending.
//We will create a status recheck cycle later for such cases.
//In case of a system crash, we should also leave the payment in pending status to be handled in the status recheck cycle.
}
}
```
The important thing to notice here is that we only mark a payment as FAILED when there is a clear indication of its failure.
We use the [check deposit status](/v2/api-reference/deposits/check-deposit-status) endpoint when in doubt whether the payment was `ACCEPTED` by PawaPay.
Implementing the considerations listed above avoids almost all discrepancies of payment statuses between your system and PawaPay.
When using callbacks to receive the final statuses of payments, issues like network connectivity, system downtime, and configuration errors might cause the callback not to be received by your system.
To avoid keeping your customers waiting, we strongly recommend implementing a status recheck cycle.
This might look something like the following.
```json theme={null}
//Run the job every few minutes.
var pendingInvoices = invoices.getAllPendingForLongerThan15Minutes();
for ( invoice in pendingInvoices ) {
var checkResult = PawaPay.checkDepositStatus(invoice.getExternalPaymentId);
if ( checkResult.status == "FOUND" ) {
//Determine if the payment is in a final status and handle accordingly
handleInvoiceStatus(checkResult.data);
} else if (checkResult.status == "NOT_FOUND" ) {
//The payment has never reached PawaPay. Can be failed safely.
invoice.setPaymentStatus(FAILED);
} else {
//Something must have gone wrong. Leave for next cycle.
}
}
```
Having followed the rest of the guide, with this simple reconciliation cycle, you should not have any inconsistencies between your system and PawaPay.
Having these checks automated will take a load off your operations and support teams as well.
## Payments in reconciliation
When using PawaPay, you might find that a payment status is `IN_RECONCILIATION`.
This means that there was a problem determining the correct final status of a payment.
When using PawaPay **all payments are reconciled** by default and automatically - we validate all final statuses to ensure there are no discrepancies.
When encountering payments that are `IN_RECONCILIATION` you do not need to take any action.
The payment has already been sent to our automatic reconciliation engine and it's final status will be determined soon.
The reconciliation time varies by provider. Payments that turn out to be successful are reconciled faster.
## What to do next?
We've made everything easy to test in our sandbox environment before going live.
We have different phone numbers that you can use to test various failure scenarios on your sandbox account.
Make sure all the failure codes are handled.
To ensure your funds are safe even if your API token should leak, you can always implement signatures for financial calls to add another layer of security.
Have a look at what to consider to make sure everything goes well.