> ## Documentation Index
> Fetch the complete documentation index at: https://docs.pawapay.io/llms.txt
> Use this file to discover all available pages before exploring further.
# Topping up your wallets
> How to pre-fund your PawaPay wallet so you can make payouts.
To avoid any delays, please make sure that all funds for payouts/disbursements are sent from an account owned by your company. If you need to send funds through a contractual partner, please go through the [adding a Liquidity Partner](#adding-a-liquidity-partner) journey described below on this page.
In order to make payouts via our API, your wallet must have sufficient funds available. Where a payout request is made and the wallet has insufficient balance to complete the transaction, the transaction will fail.
Accordingly, if you intend to use payouts you will be required to pre-fund (top up) your PawaPay wallet.
In order to streamline the process you are encouraged to follow the instructions below whenever a top up is being made to your PawaPay wallet.
## Send your funds to the correct bank account
When sending funds to top up your wallet in a particular country, you are requested to send those funds to the bank account for the respective market which will be presented to you in the PawaPay Dashboard. Remember to always include your account specific ID to each payment you make. This will also be presented to you in the payment instruction we give.
To use Top ups in the Dashboard your merchant account must have either payouts or remittances enabled.
You must also have either the "Settlements and top ups" role, or be an "Administrator".
If you don’t have access, please contact your account administrator or the PawaPay team.
## Creating a top up
You can start a new top up at any time from the **Top ups** page in the Dashboard. Click **Create new top up** and the Dashboard will walk you through five short steps.
Select one or more wallets that will receive the money. Each wallet is shown with its country and currency — for example, *Uganda UGX* or *Ghana GHS*. You can tick as many as you need, or use **Select all** to pick them all at once.
If you don't see a wallet you expect to be there, your PawaPay account may not be set up for that market yet.
Pick the method you will use to send us the money. See [Choosing a funding method](#choosing-a-funding-method) below for a plain-English explanation of each option.
Pick the currency you will send. The Dashboard only shows currencies that are valid for the wallets and funding method you chose in the previous steps. If something isn't listed, it isn't currently supported for your selection.
For each wallet you picked in step 1, type in how much you want credited. The Dashboard keeps a running **Total amount to top up** on the right so you can see the full amount you need to transfer.
This is the final step. The Dashboard will show you:
* The **bank account** you should send the funds to.
* Your **unique merchant code** — a short reference you must include with the transfer (see [Your unique merchant code](#your-unique-merchant-code) below).
* An **expected timeline**. We always try to process top ups as soon as possible but the timelines vary country by country.
Once you've made the transfer from your bank, come back to this screen and upload your Proof of Payment — a screenshot or PDF of the SWIFT confirmation or bank receipt. Then hit **Top up**.
## Choosing a funding method
Step 2 of the wizard asks how you want to fund your balance. You will see one or more of the following options — the ones available depend on your account setup:
Send funds from a bank account owned by your company via a standard bank/SWIFT transfer. This is the most common option. The Dashboard will show you the PawaPay bank account you should send the money to at step 5.
Move money you already hold in one PawaPay wallet into another PawaPay wallet. You'll be asked to pick which PawaPay wallet the money should come from.
A Liquidity Partner is a third party — for example, an aggregator or on-the-ground partner — that funds your wallet on your behalf. Before you can use one, they need to be approved by our Treasury team. See [Adding a Liquidity Partner](#adding-a-liquidity-partner) below.
## Your unique merchant code
Every top up comes with a **unique merchant code**, which is a short reference shown on the payment instructions screen.
You **must** include this code in the reference / description / narration field of your bank transfer. Without it, our Treasury team cannot match your payment to your account, which will delay your top up.
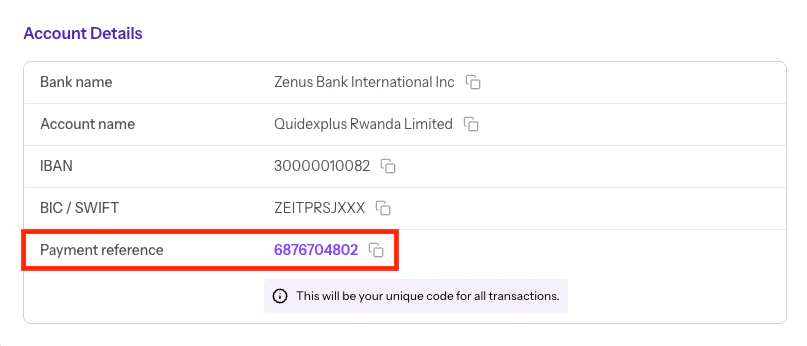 The Dashboard has a **Copy** button next to the code so you can paste it straight into your bank's transfer form. The same code needs to be reused across your top ups as it identifies your account, not the individual payment.
## Adding a Liquidity Partner
If someone other than your own company is going to send us the funds — for example, a local aggregator or a contractual partner — then they need to be onboarded as a **Liquidity Partner** first. This is a one-time setup per partner.
The Dashboard has a **Copy** button next to the code so you can paste it straight into your bank's transfer form. The same code needs to be reused across your top ups as it identifies your account, not the individual payment.
## Adding a Liquidity Partner
If someone other than your own company is going to send us the funds — for example, a local aggregator or a contractual partner — then they need to be onboarded as a **Liquidity Partner** first. This is a one-time setup per partner.
 ### How to add one
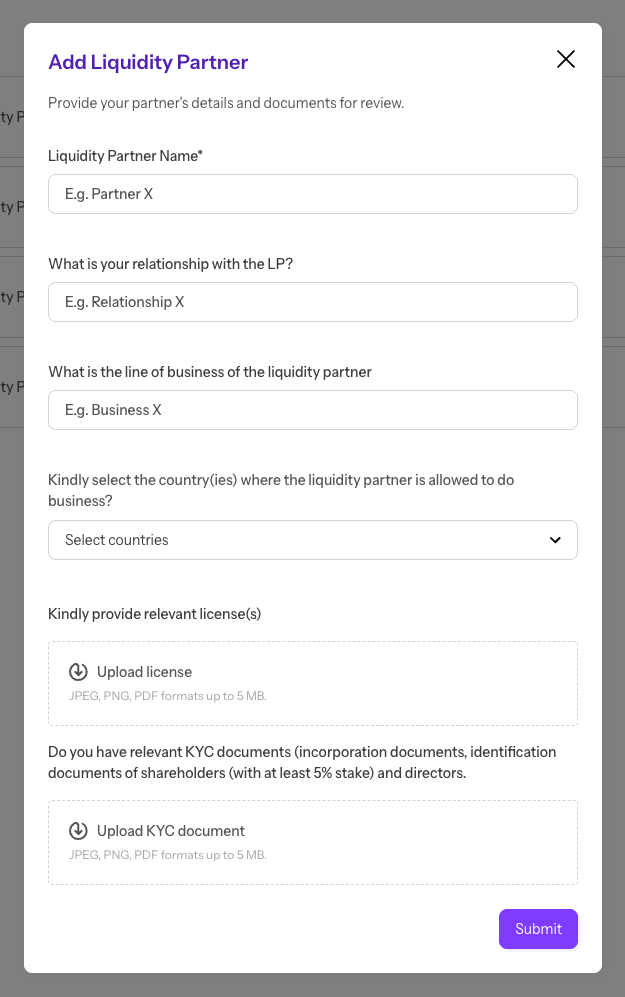
From the **Top ups** page, click **Add Liquidity Partner** (or use the **Add new Liquidity Partner** link inside step 2 of the top up wizard).
You'll be asked for:
* **Liquidity Partner name** — the legal name of the partner.
* **Your relationship with the partner** — a short description of how you work together.
* **Line of business** — what the partner does.
* **Country coverage** — the countries they're licensed / allowed to operate in.
Attach:
* **Licenses** — relevant financial or operating licenses the partner holds.
* **KYC documents** — incorporation documents, plus identification for shareholders with 5% or more stake and for directors.
You can upload multiple files in PDF, JPEG or PNG format, up to 50 MB each.
Click **Submit**. Your request goes to our Treasury team for review. You can track it on the **Liquidity Partners** page — the status will show as **In review** until it's been approved or rejected. You may be contacted by our team via email for further clarification.
Once a Liquidity Partner is **Approved**, they will appear as a selectable option under *Liquidity Partner* on step 2 of the top up wizard.
## After you submit a top up
Once you've uploaded your Proof of Payment, your top up lands on the **Top ups** page with a status you can track:
| Status | What it means |
| :-------------- | :-------------------------------------------------------------------- |
| **Pending** | We've received your submission but haven't started processing it yet. |
| **In progress** | Our Treasury team is reviewing the payment and crediting your wallet. |
| **Completed** | The funds are in your wallet and ready to use for payouts. |
| **Failed** | Something went wrong with processing — our team will be in touch. |
| **Rejected** | The Proof of Payment couldn't be matched to a payment we've received. |
| **Cancelled** | You (or our team) cancelled the top up before it was processed. |
You can open any top up to see its full history, add a comment for our Treasury team, or download the Proof of Payment you uploaded.
Need to do another top up that looks just like a past one? Use **Repeat top up** on any existing entry — the Dashboard will pre-fill the wizard with the same wallets so you can adjust the amounts and submit.
### How to add one
From the **Top ups** page, click **Add Liquidity Partner** (or use the **Add new Liquidity Partner** link inside step 2 of the top up wizard).
You'll be asked for:
* **Liquidity Partner name** — the legal name of the partner.
* **Your relationship with the partner** — a short description of how you work together.
* **Line of business** — what the partner does.
* **Country coverage** — the countries they're licensed / allowed to operate in.
Attach:
* **Licenses** — relevant financial or operating licenses the partner holds.
* **KYC documents** — incorporation documents, plus identification for shareholders with 5% or more stake and for directors.
You can upload multiple files in PDF, JPEG or PNG format, up to 50 MB each.
Click **Submit**. Your request goes to our Treasury team for review. You can track it on the **Liquidity Partners** page — the status will show as **In review** until it's been approved or rejected. You may be contacted by our team via email for further clarification.
Once a Liquidity Partner is **Approved**, they will appear as a selectable option under *Liquidity Partner* on step 2 of the top up wizard.
## After you submit a top up
Once you've uploaded your Proof of Payment, your top up lands on the **Top ups** page with a status you can track:
| Status | What it means |
| :-------------- | :-------------------------------------------------------------------- |
| **Pending** | We've received your submission but haven't started processing it yet. |
| **In progress** | Our Treasury team is reviewing the payment and crediting your wallet. |
| **Completed** | The funds are in your wallet and ready to use for payouts. |
| **Failed** | Something went wrong with processing — our team will be in touch. |
| **Rejected** | The Proof of Payment couldn't be matched to a payment we've received. |
| **Cancelled** | You (or our team) cancelled the top up before it was processed. |
You can open any top up to see its full history, add a comment for our Treasury team, or download the Proof of Payment you uploaded.
Need to do another top up that looks just like a past one? Use **Repeat top up** on any existing entry — the Dashboard will pre-fill the wizard with the same wallets so you can adjust the amounts and submit.